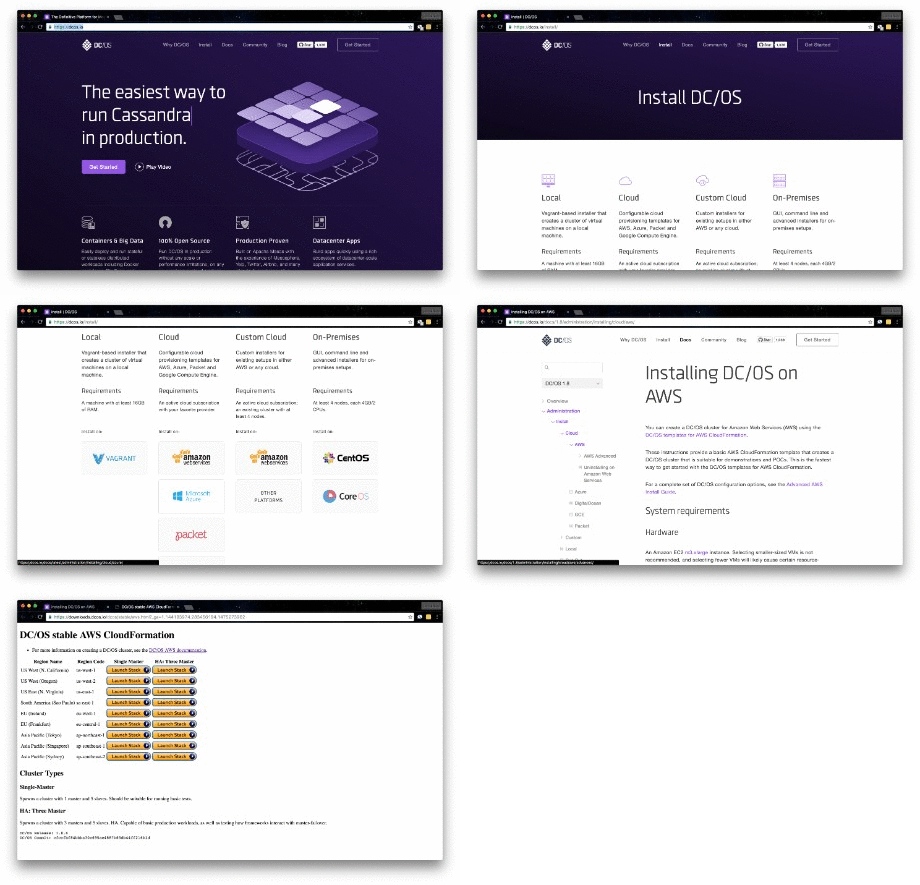

This document covers the steps required to get Scale up and running quickly using DC/OS as the underlying cluster OS and packaging system. If you already have a DC/OS cluster, you can go straight to step 2.
First, you need to setup a DC/OS cluster. This can be accomplished locally, on-premise or in a cloud deployment. We recommend using a cloud deployment as these will be the quickest and most flexible for scaling up to test experimental workloads.
Complete installation instructions for your chosen deployment can be found here.

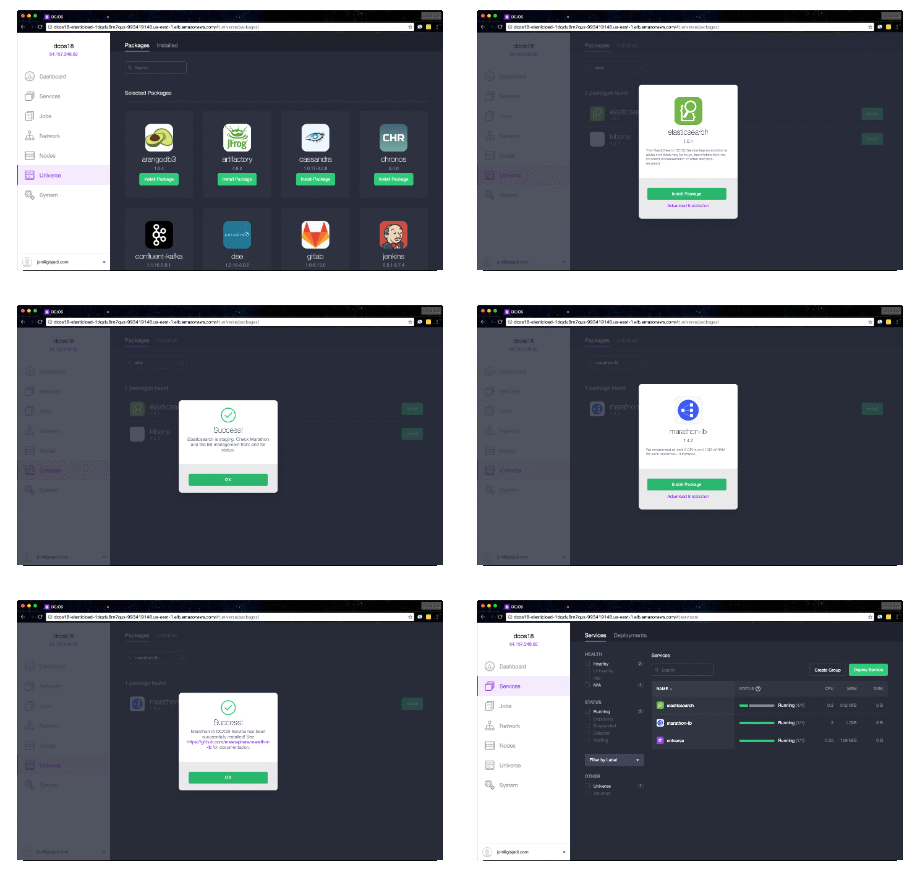
Install pre-requisite packages. Scale requires Elasticsearch to be available, with Marathon-LB being optional for external Scale API exposure. Elasticsearch is not required to be running internal to the DC/OS cluster, but this is the simplest way to get up and running.
Browse to the DC/OS Admin UI. From the left navigation, select Universe. Search for Elasticsearch, click Install and Install Package to install with defaults. Search for and install Marathon-LB, as well, if public Scale API exposure is desired. Once these installs have been launched, use the left navigation to select Services. Wait for Elasticsearch to deploy and scale to 4 running tasks before proceeding to the next step.

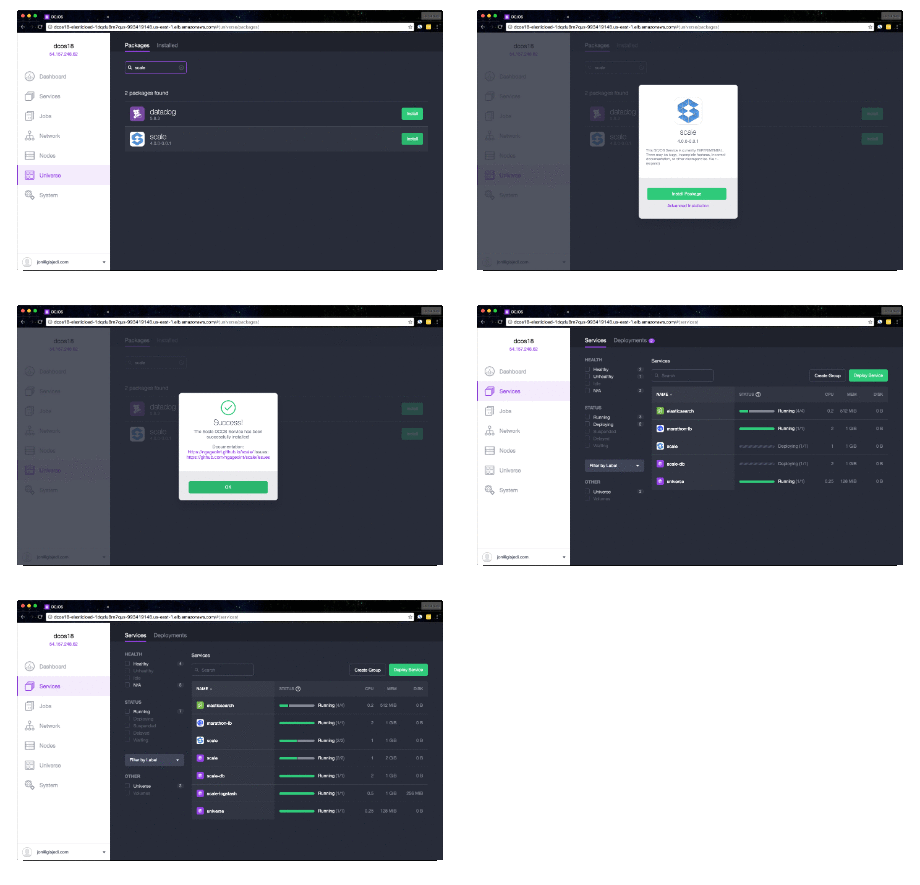
Install the Scale package. The Scale package will install all required components, save for external dependency on Elasticsearch. This default is not recommended for a production deployment, but will get you up and running quickly to experiment with the Scale system. The primary recommendation is to use an externally managed Postgres database for Scale state persistence. This can be accomplished by specifying the database connection information during installation. A user name with ownership to an existing database containing the PostGIS extension is the only requirement.
Browse to the DC/OS Admin UI. From the left navigation, select Universe. Search for Scale, click Install and Install Package to install with defaults. If wishing to customize the virtual host for public exposure, Elasticsearch being used or the database host, select the Advanced Installation link instead of Install Package.
It will take a few minutes for the deployment to finish. Check the Services pane of the DC/OS Admin
UI for a status display. When complete, you'll see scale, scale-fluentd and
scale-webserver tasks in healthy states.
NOTE: the following dcos-admin string must be replaced with the address of your
DC/OS Admin UI.

Create example job and process sample data. The Scale system is designed to allow processing on any type of data stored as discrete objects - this can be either files from network volumes or object storage, such as AWS S3. Scale is primarily focused on processing of data in a monitoring mode as it arrives. Reference Scale architecture and algorithm integration documentation for an in-depth overview of these topics.
The provided example is specific to AWS Simple Storage Service (S3) processing and for brevity uses the AWS CLI to configure needed AWS resources. This does not require Scale to be running within AWS, merely that you provide Scale the credentials to access. NOTE: In a production AWS environment, IAM roles applied to instances are strongly preferred over use of Access Keys associated with IAM users. At present, Scale provides no protection for AWS Secret Keys, so any public access to the UI / API will reveal the API keys.
Install / Configure AWS CLI. The AWS CLI will allow us to quickly deploy the supporting AWS resources in a consistent fashion. You will require an existing AWS account with an IAM user to use from your local machine. Complete documentation on this set up can be found here for your platform of choice.
Deploy S3 Bucket, SNS Topic and SQS Queue. A CloudFormation template is provided to get these resources quickly instantiated. The only parameter that must be specified is the BucketName. The below example command to launch the template uses shell syntax to generate a bucket name that is unique to satisfy the global uniqueness constraint. If you prefer a specific name, replace the ParameterValue with your chosen name.
{
	"AWSTemplateFormatVersion": "2010-09-09",
	"Description": "Creates the S3 bucket, SNS topic and SQS queue that will receive notifications",
	"Parameters": {
		"S3BucketName": {
			"MaxLength": "63",
			"ConstraintDescription": "must be a valid S3 bucket name",
			"Default": "scale-s3-create-retrieve-test",
			"Description": "Required: Specify a valid, globally unique S3 bucket name.",
			"AllowedPattern": "^[a-z0-9][a-z0-9-.]*$",
			"MinLength": "2",
			"Type": "String"
		}
	},
	"Resources": {
		"UploadsQueue": {
			"Type": "AWS::SQS::Queue",
			"Properties": {
				"ReceiveMessageWaitTimeSeconds": 20,
				"VisibilityTimeout": 120
			}
		},
		"UploadsTopic": {
			"Type": "AWS::SNS::Topic",
			"Properties": {
				"Subscription": [
					{
						"Endpoint": {
							"Fn::GetAtt": [
								"UploadsQueue",
								"Arn"
							]
						},
						"Protocol": "sqs"
					}
				]
			}
		},
		"SNSToSQSPolicy": {
			"Type": "AWS::SQS::QueuePolicy",
			"Properties": {
				"PolicyDocument": {
					"Id": "PushMessageToSQSPolicy",
					"Version": "2012-10-17",
					"Statement": [
						{
							"Sid": "allow-sns-to-send-message-to-sqs",
							"Effect": "Allow",
							"Action": [
								"sqs:SendMessage"
							],
							"Principal": {
								"AWS": "*"
							},
							"Resource": "*",
							"Condition": {
								"ArnEquals": {
									"aws:SourceArn": {
										"Ref": "UploadsTopic"
									}
								}
							}
						}
					]
				},
				"Queues": [
					{
						"Ref": "UploadsQueue"
					}
				]
			}
		},
		"Bucket": {
			"Type": "AWS::S3::Bucket",
			"Properties": {
				"AccessControl": "Private",
				"BucketName": {
					"Fn::Join": [
						"",
						[
							{
								"Ref": "S3BucketName"
							}
						]
					]
				},
				"CorsConfiguration": {
					"CorsRules": [
						{
							"AllowedHeaders": [
								"*"
							],
							"AllowedMethods": [
								"GET",
								"PUT",
								"HEAD"
							],
							"AllowedOrigins": [
								"*"
							],
							"ExposedHeaders": [
								"x-amz-server-side-encryption"
							],
							"MaxAge": "3000"
						}
					]
				},
				"NotificationConfiguration": {
					"TopicConfigurations": [
						{
							"Event": "s3:ObjectCreated:*",
							"Topic": {
								"Ref": "UploadsTopic"
							}
						}
					]
				}
			},
			"DependsOn": "BucketToUploadsTopicPolicy"
		},
		"BucketToUploadsTopicPolicy": {
			"Type": "AWS::SNS::TopicPolicy",
			"Properties": {
				"PolicyDocument": {
					"Id": "PushBucketNotificationPolicy",
					"Version": "2012-10-17",
					"Statement": [
						{
							"Sid": "AllowBucketToPushNotificationEffect",
							"Effect": "Allow",
							"Principal": {
								"AWS": "*"
							},
							"Action": "sns:Publish",
							"Resource": "*",
							"Condition": {
								"ArnLike": {
									"aws:SourceArn": {
										"Fn::Join": [
											"",
											[
												"arn:aws:s3:*:*:",
												{
													"Ref": "S3BucketName"
												}
											]
										]
									}
								}
							}
						}
					]
				},
				"Topics": [
					{
						"Ref": "UploadsTopic"
					}
				]
			}
		}
	},
	"Outputs": {
		"BucketName": {
			"Value": {
				"Ref": "Bucket"
			}
		},
		"UploadsQueueUrl": {
			"Value": {
				"Ref": "UploadsQueue"
			}
		},
		"UploadsTopicArn": {
			"Value": {
				"Ref": "UploadsTopic"
			}
		}
	}
}
aws cloudformation create-stack --stack-name scale-s3-demo --template-body file://scale-demo-cloudformation.json --parameters "ParameterKey=S3BucketName,ParameterValue=scale-bucket-`date +"%Y%m%d-%H%M%S"`"
Describe Stack Resources. Creation of the CloudFormation stack from above should be completed in only a couple minutes. The following command may be used to extract information needed to set the IAM policy so Scale can access the created resources. If the Stack status is not CREATE_COMPLETE wait a minute and run it again. The OutputValues associated with UploadsQueueUrl and BucketName from this command are what will be needed.
aws cloudformation describe-stacks --stack-name scale-s3-demo
Get Resource ARNs. The describe-stacks command does not indicate the ARN of the Queue so a second command is required to find that value. The UploadsQueueUrl placeholder below should be replaced the appropriate value returned from the previous command.
aws sqs get-queue-attributes --attribute-names "QueueArn" --queue-url UploadsQueueUrl
Create IAM User and Access Key. The Access Key and Secret Key should be noted as they will be needed by Scale to authenticate against AWS for access to our provisioned resources. Feel free to change the user name value as needed.
aws iam create-user --user-name scale-test-user
aws iam create-access-key --user-name scale-test-user
Create IAM policy and apply to user. The provided policy template will need to be updated to reflect the ARNs for your environment. The get-queue-attributes command will have given the SQS ARN. S3 ARNs are deterministic within the standard AWS regions, so it would simply be of the form arn:aws:s3:::scale-bucket, where scale-bucket is the BucketName value from describe-stacks above.
{
    "Version": "2012-10-17",
    "Statement": [
        {
            "Action": "*",
            "Effect": "Allow",
            "Resource": [
                "arn:aws:sqs:*:*:scale-s3-demo-UploadsQueue-*"
            ]
        },
        {
            "Action": "*",
            "Effect": "Allow",
            "Resource": [
                "arn:aws:s3:::scale-bucket-*"
            ]
        }
    ]
}
aws iam put-user-policy --user-name scale-test-user --policy-document file://scale-demo-policy.json --policy-name scale-demo-policy
Configure Scale for processing. The final step to process data in our S3 bucket is to configure Scale with a workspace, Strike, job type and recipe type. The following script can be used to quickly bootstrap Scale with the configuration necessary to extract the first MiB of input files and save them in the output workspace.
WARNING: It is important to note that a proper processing pipeline will consist of both an input workspace and at least one output workspace. In the interest of simplicity, this quick start uses the same workspace by the Strike process and for the output from the sample job. The only reason we don't enter into an endless processing loop (via Strike detecting output of downstream jobs in shared workspace) is because our sample job outputs files with the same name as the input. Scale filters out duplicate ingests initiated by Strike which breaks the processing chain, preventing endless looping.
#!/usr/bin/env sh

# The following environment variables are required for the successful execution of this script.
# DCOS_TOKEN: DCOS token that can found within ~/.dcos/dcos.toml once DCOS CLI is authenticated against DCOS cluster
# DCOS_ROOT_URL: The externally routable Admin URL.
# REGION_NAME: AWS Region where SQS and S3 bucket reside.
# BUCKET_NAME: AWS S3 bucket name only. Full ARN should NOT be used.
# QUEUE_NAME: AWS SQS queue name only. Full ARN should NOT be used.
# ACCESS_KEY: Access Key for IAM user that will access S3 and SQS resources.
# SECRET_KEY: Secret Key for IAM user that will access S3 and SQS resources.

cat << EOF > workspace.json
{
    "description": "s3-direct",
    "json_config": {
        "broker": {
            "bucket_name": "${BUCKET_NAME}",
            "credentials": {
                "access_key_id": "${ACCESS_KEY}",
                "secret_access_key": "${SECRET_KEY}"
            },
            "region_name": "${REGION_NAME}",
            "type": "s3"
        }
    },
    "name": "s3-direct",
    "title": "s3-direct",
    "base_url": "https://s3.amazonaws.com/${BUCKET_NAME}"
}
EOF

JOB_ARGS="1024 \${input_file} \${job_output_dir}"
cat << EOF > job-type.json
{
    "name": "read-bytes",
    "version": "1.0.0",
    "title": "Read Bytes",
    "description": "Reads x bytes of an input file and writes to output dir",
    "category": "testing",
    "author_name": "John_Doe",
    "author_url": "http://www.example.com",
    "is_operational": true,
    "icon_code": "f27d",
    "docker_privileged": false,
    "docker_image": "geoint/read-bytes",
    "priority": 230,
    "timeout": 3600,
    "max_scheduled": null,
    "max_tries": 3,
    "cpus_required": 1.0,
    "mem_required": 1024.0,
    "disk_out_const_required": 0.0,
    "disk_out_mult_required": 0.0,
    "interface": {
        "output_data": [
            {
                "media_type": "application/octet-stream",
                "required": true,
                "type": "file",
                "name": "output_file"
            }
        ],
        "shared_resources": [],
        "command_arguments": "${JOB_ARGS}",
        "input_data": [
            {
                "media_types": [
                    "application/octet-stream"
                ],
                "required": true,
                "partial": true,
                "type": "file",
                "name": "input_file"
            }
        ],
        "version": "1.1",
        "command": ""
    },
    "error_mapping": {
        "version": "1.0",
        "exit_codes": {}
    },
    "trigger_rule": null
}
EOF

cat << EOF > recipe-type.json
{
    "definition": {
        "input_data": [
            {
                "media_types": [
                    "application/octet-stream"
                ],
                "name": "input_file",
                "required": true,
                "type": "file"
            }
        ],
        "jobs": [
            {
                "dependencies": [],
                "job_type": {
                    "name": "read-bytes",
                    "version": "1.0.0"
                },
                "name": "read-bytes",
                "recipe_inputs": [
                    {
                        "job_input": "input_file",
                        "recipe_input": "input_file"
                    }
                ]
            }
        ]
    },
    "description": "Read x bytes from input file and save in output dir",
    "name": "read-byte-recipe",
    "title": "Read Byte Recipe",
    "trigger_rule": {
        "configuration": {
            "condition": {
                "data_types": [],
                "media_type": ""
            },
            "data": {
                "input_data_name": "input_file",
                "workspace_name": "s3-direct"
            }
        },
        "is_active": true,
        "name": "read-byte-trigger",
        "type": "INGEST"
    },
    "version": "1.0.0"
}
EOF

cat << EOF > strike.json
{
  "name": "s3-strike-process",
  "title": "s3-strike-process",
  "description": "s3-strike-process",
  "configuration": {
    "version": "2.0",
    "workspace": "s3-direct",
    "monitor": {
      "type": "s3",
      "sqs_name": "${QUEUE_NAME}",
      "credentials": {
        "access_key_id": "${ACCESS_KEY}",
        "secret_access_key": "${SECRET_KEY}"
      },
      "region_name": "${REGION_NAME}"
    },
    "files_to_ingest": [
      {
        "filename_regex": ".*",
        "data_types": [
          "all_my_mounted_files"
        ]
      }
    ]
  }
}
EOF


curl -X POST -H "Authorization: token=${DCOS_TOKEN}" -H "Content-Type: application/json" -H "Cache-Control: no-cache" -d @workspace.json "${DCOS_ROOT_URL}/service/scale/api/v5/workspaces/"
curl -X POST -H "Authorization: token=${DCOS_TOKEN}" -H "Content-Type: application/json" -H "Cache-Control: no-cache" -d @job-type.json "${DCOS_ROOT_URL}/service/scale/api/v5/job-types/"
curl -X POST -H "Authorization: token=${DCOS_TOKEN}" -H "Content-Type: application/json" -H "Cache-Control: no-cache" -d @recipe-type.json "${DCOS_ROOT_URL}/service/scale/api/v5/recipe-types/"
curl -X POST -H "Authorization: token=${DCOS_TOKEN}" -H "Content-Type: application/json" -H "Cache-Control: no-cache" -d @strike.json "${DCOS_ROOT_URL}/service/scale/api/v5/strikes/"
export DCOS_TOKEN="DCOS token that can found within ~/.dcos/dcos.toml once DCOS CLI is authenticated against DCOS cluster."
export DCOS_ROOT_URL="The externally routable Admin URL."
export REGION_NAME="AWS Region where SQS and S3 bucket reside."
export BUCKET_NAME="AWS S3 bucket name only. Full ARN should NOT be used."
export QUEUE_NAME="AWS SQS queue name only. Full ARN should NOT be used."
export ACCESS_KEY="Access Key for IAM user that will access S3 and SQS resources."
export SECRET_KEY="Secret Key for IAM user that will access S3 and SQS resources."
sh scale-init.sh
Test Scale ingest. Now that our configuration is complete we can verify that Scale is ready to process. We will drop a new file into our bucket using the AWS CLI. This file can be anything, but a text file over 1 MiB is best to demonstrate the jobs ability to extract only the first MiB. The following will do nicely:
base64 /dev/urandom | head -c 2000000 > sample-data-2mb.txt
aws s3 cp --acl public-read sample-data-2mb.txt s3://${BUCKET_NAME}/
View processing results. In the Scale UI, navigate to Jobs. A Read Bytes job should have completed. Click on the job in the table and see the outputs in the detail view. You should be able to see that the file size is 1MiB. Feel free to download and inspect. Congratulations, you've processed your first file within Scale! For more advanced examples refer to the Scale GitHub and Docker Hub repositories, as well as the documentation.