1. Purpose
Scale and Seed optimize algorithm development from proof of concept to operational execution within distributed processing clusters. This guide introduces data scientists and algorithm developers to these technologies developed at the Research directorate of the National Geospatial-Intelligence Agency (NGA).
Scale is a distributed processing framework for near real-time processing of large data sets. It frees data scientists and algorithm developers from the complexity of distributed system concepts and offers an integration platform for highly parallel processing of data. Scale also ensures decision makers and system administrators are able to visually monitor data flows and ensure reliable data processing. It enables a true DevOps environment for algorithm development and cloud transition.
Seed is a general standard to aid in the discovery and consumption of a discrete unit of work contained within a Docker image. It is a JSON-defined manifest that is embedded into the Docker image as a label. Seed allows data scientists to focus their expertise on solving domain problems and provides tools to ensure their algorithm is packaged properly for operational use. Seed can be used throughout the development lifecycle to build, test and package within a simulated environment that closely emulates targeted operational environments. This reduces risk and allows the algorithm requirements to be explicitly defined by the developers who best understand their processing needs. Compliance with the Seed specification will be a requirement for algorithms to run in future versions of Scale.
SILO (Seed Images Location Operation) is a REST API provided by the Seed team for discovering Seed images. The API allows users to scan one or more repositories for Seed images and then search the resulting images and their manifests by keywords. Frameworks such as Scale can use these endpoints to assist users in finding algorithm images and creating jobs out of them.
The Seed command-line interface (CLI) is a standalone tool for working with Seed jobs locally. This document will focus primarily on using the Seed CLI to build, test and publish your algorithm as a Seed-compliant Docker image. The Seed toolchain consists of the CLI, SILO, and a processing system that can consume Seed images, such as Scale. Our recommendation is to familiarize yourself with using Seed by working through this tutorial. Details on more advanced topics are provided in the Reference section.
|
Commands that can be run from the terminal are indicated in monospace font or as callouts; e.g.
|
2. Expectations
2.1. Docker and Linux Fundamentals
Before using Seed, you should have a working familiarity with developing code using modern tools; at minimum knowledge of Docker and Linux fundamentals.
This guide is written with the assumption that you are using a Linux workstation.
The Seed CLI is heavily reliant on Docker to build and package Seed images (Docker image with Seed metadata), so it is highly recommended that you have superuser (i.e. sudo) access.
2.2. Algorithm Requirements
It is beneficial to identify and understand the following characteristics of each algorithm you intend to package with Seed:
-
Software requirements (e.g. libraries, frameworks, and/or software dependencies needed)
-
Hardware requirements (e.g. CPU and memory requirements, GPUs, etc.)
-
Reference material or other support data
-
Licenses required
3. Docker Installation
Refer to the Docker documentation for instructions on how to install Docker for your platform.
Depending on your IT environment, you may need to request an administrator install Docker for you.
The current version of Seed (1.2.1) requires Docker version 18.09 or newer.
To verify that installation was successful and confirm the Docker version, run the command docker --version from the terminal.
|
Depending on your environment, you may need superuser privileges to execute the |
Output should be similar to the following:
docker version 19.03.8, build afacb8bIf this command fails, verify the Docker daemon is running using the docker info command. You can also use operating system
utilities, such as sudo systemctl is-active docker, sudo status docker or sudo service docker status, or checking the
service status using Windows utilities.
|
If using Windows, we strongly recommend using Seed with WSL 2 in order to avoid incompatibilities between environments. Algorithms must use a base Linux operating system to run in Scale. |
3.1. Using WSL 2 on Windows
When using Seed on Windows, we recommend installing a Linux distro from the Micrsoft Store, such as Ubuntu 20.04 LTS. After installing, check the Windows Docker Desktop settings under Resources → WSL Integration to ensure Docker integration is enabled for the distro. Open the application, follow the prompts to configure the environment, and proceed with Seed CLI Installation.
4. Seed CLI Installation
The Seed CLI can be installed by downloading a binary from the releases page on GitHub.
Under each release, there is an "Assets" section with downloadable binaries for various operating systems.
Download the appropriate version for your system and rename the downloaded binary file seed to match the usage in the rest of this guide.
Move the binary to your desired location on your filesystem:
mkdir /path/to/seed-dir  # e.g. mkdir /opt/seed
mv ./seed-linux-amd64 /path/to/seed-dir/seed # e.g. mv ./seed-linux-amd64 /opt/seed/seed|
Use |
In order to run the seed command without needing to specify the full path to the binary, add it to your $PATH variable.
The method for doing this will depend on the operating system or terminal shell you are using.
On Linux or Mac OS, this typically involves adding an entry to a config file.
Common config files include ~/.bash_profile, ~/.bashrc, ~/.profile, or ~/.tcsh_profile.
Using ~/.bash_profile as an example, if it does not exist, create it using the following command:
touch ~/.bash_profileOpen it in your desired text editor, and add the following line:
export PATH=$PATH:/path/to/seed-dir # e.g. export PATH=$PATH:/opt/seedRun source ~/.bash_profile to reload the profile.
To verify that installation was successful, run the command seed from the terminal. The Seed logo, usage instructions, and a list of commands should be displayed:
       .',,;;;;,,''''.
     .::::::::::;,,'.
    ,c:;;;;;::. ....
., .c;,;;::::. .,,,,,'.
'c;,;,;:::::. .,'''''',.      ';;;;;.   .;;;;;;;.   ;;;;;;;,   ,;;;;;,.
;:::,;::::;.  ,'''''''''     ::.   .    'c,        .::         ;c.   ;c'
,:;;,,'..    .,''''''','     ;:,.       'c'        .:;         ;:.   .:,
 ,:::,.     .,'''''''',.      .,;::,    ':;,,,     .::;,;.     ;:.   .c,
   ....''..','''''''',.           '::   'c'        .:;         ;:.   .:,
         .,'''''''','.      .;.   .c;   'c,        .c:.        ;c.  .;c.
         ,,,,,,,,,'.         ';;;;;'    .;;;;;;;.   ;;;;;;;,   ';;;;;,.
         ..'''...

Usage:	seed COMMAND

A tool for assisting in creating seed spec compliant algorithms

Commands:
  build 	Builds Seed compliant Docker image
  batch 	Executes Seed compliant docker image over multiple iterations
  init  	Initialize new project with example seed.manifest.json file
  list  	Lists all Seed compliant images residing on the local system
  publish	Publishes Seed compliant images to remote Docker registry
  pull		Pulls images from remote Docker registry
  run   	Executes Seed compliant Docker image
  search	Allows for discovery of Seed compliant images hosted within a Docker registry (default is docker.io)
  spec		Displays the specification for the current Seed version
  unpublish	Removes images from remote Docker registry
  validate	Validates a Seed spec
  version	Prints the version of Seed spec

Run 'seed COMMAND --help' for more information on a command.
5. Seed Tutorial
Following this step-by-step tutorial will quickly get you up and running with Seed and demonstrate the steps needed to arrive at a complete Seed image. By the end of this guide, you will be able to:
-
Build a Seed compliant algorithm
-
Leverage the Seed CLI to ensure Seed compliance and build a Seed compliant Docker image
-
Leverage the Seed CLI to test your Seed algorithm
-
Leverage the Seed CLI to publish your Seed algorithm
-
Understand next steps to automated distributed execution
5.1. Seed Compliance
For your algorithm to be compatible with Seed, it must satisfy the following criteria:
-
Run on Linux. There is no language limitation other than it must be able to execute on Linux. You can use the Docker base image of your choice. Alpine and CentOS are the preferred Linux flavors.
-
Command-line Invocation. Seed provides input via either arguments or environment variables. If your algorithm is prompting for input from a user, the job will continue to wait until it times out. There are no display popups such as error dialogs, file selection menus, splash screens, etc. In the event where a display device is required for rendering data, a pseudo device must be used.
-
Configurable. Your algorithm will be run in a standalone container, therefore absolute file paths must not be embedded in the source code for your development environment. Necessary file paths should be passable into the algorithm either via an environment variable or from the command line.
-
Reporting. While this isn’t required, it is ideal if your algorithm outputs its progress and errors to the console and returns an appropriate exit code. Unique exit codes should be used for failures that can be anticipated. If failures are not captured appropriately, Seed will only be able to identify a general algorithm error, which may make debugging issues more difficult.
5.2. Sample Algorithm
The foundation of a Seed image is the algorithm that it contains. Everything that follows is informed by the requirements of your unique algorithm: the inputs it requires, the outputs it generates and the resources that are required to perform the computations. For this guide, we are going to use a very simple algorithm, one which takes a single image file as input and rotates the image a specified number of degrees. We are going to output metadata about the algorithm both to the console and to a file. This example illustrates how to accomplish the following:
-
Accept a file input
-
Accept an integer type input
-
Write to the console
-
Write to an output file
5.2.1. Running in Python
This example assumes Python 3 is installed and uses the Pillow library for image processing. For help installing Python, see the Python Beginners Guide. For help installing Pillow, see its installation instructions.
We are going to write our algorithm using basic Linux commands. Use your favorite text editor or IDE to create an image_rotate.py file:
import json
import os
import shutil
import sys
from PIL import Image

def rotate_image(source_image_path, rotate_degrees, output_dir):
    """Rotates an image a specified number of degrees"""
    product_image_name =  f'ROTATED_{rotate_degrees}_{os.path.basename(source_image_path)}'

    # Open source image
    original_image = Image.open(source_image_path)

    # Rotate it specified number of degrees
    rotated_image = original_image.rotate(int(rotate_degrees), 0, 1)
    rotated_image.save(product_image_name)

    # Move saved image to output directory
    product_image_path = os.path.join(output_dir, product_image_name)
    if not os.path.exists(output_dir):
        os.makedirs(output_dir)
    shutil.move(product_image_name, product_image_path)

    return product_image_name

if __name__ == "__main__":

    source_image_path = sys.argv[1]
    rotate_degrees = sys.argv[2]
    output_dir = sys.argv[3]

    product_image_path = rotate_image(source_image_path, rotate_degrees, output_dir)
If you have cloned this repository, the image file seed.png will exist in the guide/example directory.
If not, you will need to download the file or supply your own image file.
Run the algorithm using the following command:
python image_rotate.py seed.png 180 outputA new image file named ROTATED_180_seed.png will be created in the output directory.
If a ModuleNotFound error occurs, see the Python ModuleNotFound Errors section.
5.2.2. Running in Docker
First, create a script called image_rotate.sh in the same directory as the Python file created above:
#!/bin/sh

INPUT=$1
DEGREES=$2
OUTPUT_DIR=$3

echo ''
echo '-----------------------------------------------------------------'
echo 'Rotating image with arguments '${INPUT} ${DEGREES} ${OUTPUT_DIR}

python ./image_rotate.py $INPUT $DEGREES $OUTPUT_DIR
rc=$?

echo 'Done rotating image'
echo '-----------------------------------------------------------------'
echo ''
exit ${rc}
We will use this script to invoke our image rotation algorithm.
Create a file named Dockerfile in the same directory:
FROM python:3.8-alpine

RUN apk add build-base python3-dev py-pip jpeg-dev zlib-dev
ENV LIBRARY_PATH=/lib:/usr/lib

RUN pip install --upgrade pip && \
    pip install --upgrade Pillow >= 7

WORKDIR /algo

ADD ./image_rotate.py .
ADD ./image_rotate.sh .
With these files, we can create our initial Docker containerized sample algorithm. Issue the following terminal commands to build the Docker image:
sudo docker build -t img-test .The image may take a minute or two to build.
The -t flag is used to specify the name and optional tag for the Docker image in the 'name:tag' format.
In this case, we have used the name img-test, but we could use any name.
Once it completes successfully, you should see output similar to the following:
Successfully built 84dd346586d1
Successfully tagged img-test:latest
Now run the Docker container using the following command:
sudo docker run --rm -v ${PWD}:/algo img-test sh image_rotate.sh seed.png 45 outputOutput should be similar to the following:
-----------------------------------------------------------------
Rotating image with arguments seed.png 45 output
Done rotating image
-----------------------------------------------------------------
Let’s recap what we’ve done:
-
We wrote a simple Python algorithm that consumes three positional parameters: input file path, degrees of rotation, and output file directory.
-
Our algorithm uses the Pillow library to rotate the image a specified number of degrees.
-
The algorithm saves the rotated image as a new file in the specified output directory.
-
We wrote a simple shell script to launch our algorithm.
-
We wrote a basic Dockerfile that identified a base image, installed dependencies, and copied our algorithm and launch script into it.
-
We built a Docker image of our own and called it
img-test. -
Finally, we ran a Docker container from our
img-testimage, mounted a volume, and passed it the command to run our algorithm with the required positional parameters.
There are some observations we should make about what we just accomplished.
-
We made our data accessible to the container in our
docker runcommand by mounting a volume with-v ${PWD}:/algo. This maps our current working directory to the path/algoinside the container. -
We used the
WORKDIRcommand in our Dockerfile to set the working directory to/algo. -
We prefixed our call to the script with
shso that we did not have to set the execute bit. Alternatively, we could set the execute bit in the Dockerfile withRUN chmod +x ./image_rotate.sh. -
We used our
rotate_image.shscript to call our Python code. This is a common pattern when writing Dockerfiles. -
Because we mounted our current directory as a volume, our specified output directory
outputis created in our current directory, and the output of the algorithm is placed in this directory.
|
Further discussion of volume mounts and getting data into a container can be found in the Reference Data section. |
With the img-test Docker image created, we could share this with other people on our local machine.
We could also tag it and push it to a remote registry (hub.docker.com, quay.io, etc.) and others would be able to run it.
For a basic algorithm example, this is fairly simple, but what if we have a more complicated algorithm with specific resource requirements?
What if our algorithm requires large supporting reference datasets?
What if we need to leverage runtime licenses that must be carefully protected?
What if we want all of these requirements to be explicitly documented and transparent to the consumers of your algorithm?
Seed helps solve these problems.
5.3. Initialization
Building on our example algorithm, let’s define the Seed manifest.
A Seed manifest is a JSON document that defines an algorithm’s purpose, who created it, the interface the algorithm provides, and its resource requirements.
When you are building a Seed image, standard practice is to put the seed.manifest.json file in the same directory as the project’s Dockerfile.
To simplify the initial construction of this file you can use the seed init command from the same directory as the algorithm code:
seed init
Created Seed file: /Users/user/code/seed/guide/example/seed.manifest.json
The newly-created seed.manifest.json file includes all common sections of the manifest and can be revised to reflect your specific algorithm.
|
The full Seed specification can be found at https://ngageoint.github.io/seed/seed.html. |
Let’s start by updating the manifest for our sample algorithm to match the following:
{
  "seedVersion": "1.0.0",
  "job": {
    "name": "image-rotate",
    "jobVersion": "1.0.0",
    "packageVersion": "1.0.0",
    "title": "Image Rotate",
    "description": "Rotates an image a specified number of degrees",
    "tags": [
      "jpg",
      "png",
      "image processing"
    ],
    "maintainer": {
      "name": "Matt Anderson",
      "organization": "AIS",
      "email": "matt.anderson@appliedis.com"
    },
    "timeout": 3600,
    "interface": {
      "command": "sh image_rotate.sh ${INPUT_FILE} ${DEGREES} ${OUTPUT_DIR}",
      "inputs": {
        "files": [
          {
            "name": "INPUT_FILE",
            "required": true,
            "mediaTypes": [
              "image/jpeg", "image/jpg", "image/png"
            ]
          }
        ],
        "json": [
          {
            "name": "DEGREES",
            "type": "integer",
            "required": true
          }
        ]
      },
      "outputs": {
        "files": [
          {
            "name": "ROTATED_IMAGE",
            "multiple": false,
            "pattern": "ROTATED_*"
          }
        ]
      }
    },
    "resources": {
      "scalar": [
        {
          "name": "cpus",
          "value": 0.5
        },
        {
          "name": "mem",
          "value": 512
        }
      ]
    }
  }
}|
In this example, we have named our output file |
There are a number of specific settings we made here that are worth highlighting:
-
job.interface.command. This setting defines exactly what command is issued on container launch. It mirrors the Docker command we ran in the previous section. The primary difference here is the use of environment variables. -
job.interface.commandenvironment variables. These variable names correspond to thenamevalues within thejob.interface.inputsandjob.interface.outputsobjects. If anENTRYPOINTis specified in the Dockerfile, the contents of this setting will be passed to it. -
${INPUT_FILE}. The Seed specification contract ensures that this variable will be populated with an absolute path to the input since we have marked it as a required input. -
${DEGREES}. The Seed specification contract ensures that this variable will be populated with an integer value to the input since we have given it the explicit type "integer" and marked it as a required input. -
${OUTPUT_DIR}. Seed provides some contextual values that ensure there are consistent locations for output capture. TheOUTPUT_DIRenvironment variable is provided to all jobs and any file products must be placed under this location. -
OUTPUT_FILEpattern expression. The expression is rooted atOUTPUT_DIRand all patterns defined are relative to that location. This is why we tell our job to write to${OUTPUT_DIR}/output.txtand ourpatternis defined as*.txt. -
job.resources.scalar. We provided a fractional CPU requirement and an amount of memory. We can use theinputMultipliersetting to inform Seed to allocate memory (MiB) in proportion to the total size of input files (MiB). In other words, if ourINPUT_FILEis 25 MiB the allocated memory will be: 256 MiB + (4.0 * 25 MiB) = 356 MiB.
|
A significant advantage of using Seed CLI is that it can emulate the resource constraints that will be placed on your algorithm in a production cluster environment. |
5.4. Validate & Build
Validation and injection of the Seed manifest into the final package ensures adherence to the specification. The CLI allows you to validate a standalone manifest file, as well as apply validation as part of the build process. Let’s build our job to see this in action:
|
Depending on your environment, you may need superuser privileges to execute the |
seed build|
The |
INFO: Validating seed manifest file /Users/user/code/seed/guide/example/seed.manifest.json against schema...
INFO: Checking for variable name collisions...
WARNING: /Users/user/code/seed/guide/example/seed.manifest.json does not specify some recommended resources
Specifying cpu, memory and disk requirements are highly recommended
The following resources are not defined: [disk]
SUCCESS: No errors found. /Users/user/code/seed/guide/example/seed.manifest.json is valid.
The first step of the build is to apply validation.
We can see the file that is being validated against the schema.
We are also informed that our resources section does not contain all the recommended resource objects.
Our build completed successfully.
We can see the com.ngageoint.seed.manifest LABEL that contains our serialized manifest in Step 3/3 of the Docker build process, as well as the seed run command in the final line of the output:
INFO: Building image-rotate-1.0.0-seed:1.0.0
dockerfile: .
INFO: Running Docker command:
docker build -t image-rotate-1.0.0-seed:1.0.0 /Users/user/code/seed/guide/example --label com.ngageoint.seed.manifest="{\"seedVersion\":\"1.0.0\",\"job\":{\"name\":\"image-rotate\",\"jobVersion\":\"1.0.0\",\"packageVersion\":\"1.0.0\",\"title\":\"Image Rotate\",\"description\":\"Rotates an image a specified number of degrees\",\"tags\":[\"jpg\",\"png\",\"image processing\"],\"maintainer\":{\"name\":\"Matt Anderson\",\"organization\":\"AIS\",\"email\":\"matt.anderson@appliedis.com\"},\"timeout\":3600,\"interface\":{\"command\":\"sh image_rotate.sh \${INPUT_FILE} \${DEGREES} \${OUTPUT_DIR}\",\"inputs\":{\"files\":[{\"name\":\"INPUT_FILE\",\"required\":true,\"mediaTypes\":[\"image\/jpeg\",\"image\/jpg\",\"image\/png\"]}],\"json\":[{\"name\":\"DEGREES\",\"type\":\"integer\",\"required\":true}]},\"outputs\":{\"files\":[{\"name\":\"ROTATED_IMAGE\",\"multiple\":false,\"pattern\":\"ROTATED_*\"}]}},\"resources\":{\"scalar\":[{\"name\":\"cpus\",\"value\":0.1},{\"name\":\"mem\",\"value\":256,\"inputMultiplier\":4.0},{\"name\":\"disk\",\"value\":128}]}}}"
Sending build context to Docker daemon  18.23MB
Step 1/8 : FROM python:3.8-alpine
 ---> db0e2316082c
Step 2/8 : RUN apk add build-base python-dev py-pip jpeg-dev zlib-dev
 ---> Using cache
 ---> 427251dce74d
Step 3/8 : ENV LIBRARY_PATH=/lib:/usr/lib
 ---> Using cache
 ---> 61111d74877b
Step 4/8 : RUN pip install --upgrade pip &&     pip install --upgrade Pillow >= 7
 ---> Using cache
 ---> af2fcca4e098
Step 5/8 : WORKDIR /algo
 ---> Using cache
 ---> 40fd0aa70d58
Step 6/8 : ADD ./image_rotate.py .
 ---> Using cache
 ---> fbdbd31a55e0
Step 7/8 : ADD ./image_rotate.sh .
 ---> Using cache
 ---> 5bbd749f6360
Step 8/8 : LABEL com.ngageoint.seed.manifest="{\"seedVersion\":\"1.0.0\",\"job\":{\"name\":\"image-rotate\",\"jobVersion\":\"1.0.0\",\"packageVersion\":\"1.0.0\",\"title\":\"Image Rotate\",\"description\":\"Rotates an image a specified number of degrees\",\"tags\":[\"jpg\",\"png\",\"image processing\"],\"maintainer\":{\"name\":\"Matt Anderson\",\"organization\":\"AIS\",\"email\":\"matt.anderson@appliedis.com\"},\"timeout\":3600,\"interface\":{\"command\":\"sh image_rotate.sh \${INPUT_FILE} \${DEGREES} \${OUTPUT_DIR}\",\"inputs\":{\"files\":[{\"name\":\"INPUT_FILE\",\"required\":true,\"mediaTypes\":[\"image\/jpeg\",\"image\/jpg\",\"image\/png\"]}],\"json\":[{\"name\":\"DEGREES\",\"type\":\"integer\",\"required\":true}]},\"outputs\":{\"files\":[{\"name\":\"ROTATED_IMAGE\",\"multiple\":false,\"pattern\":\"ROTATED_*\"}]}},\"resources\":{\"scalar\":[{\"name\":\"cpus\",\"value\":0.1},{\"name\":\"mem\",\"value\":256,\"inputMultiplier\":4.0},{\"name\":\"disk\",\"value\":128}]}}}"
 ---> Running in 6aa9a7b29fa1
Removing intermediate container 6aa9a7b29fa1
 ---> 7c20874e1ba9
Successfully built 7c20874e1ba9
Successfully tagged image-rotate-1.0.0-seed:1.0.0
INFO: Successfully built image. This image can be published with the following command:
seed publish -in image-rotate-1.0.0-seed:1.0.0 -r my.registry.address
This image can be run with the following command:
seed run -rm -in image-rotate-1.0.0-seed:1.0.0 -i INPUT_FILE=<file> -j DEGREES=<json> -o <outdir>
Let’s address the warning regarding disk resource by updating our manifest with a third object in the job.resources.scalar array:
{
  "seedVersion": "1.0.0",
  "job": {
    ...<omitted for brevity>...
    "resources": {
      "scalar": [
        {
          "name": "cpus",
          "value": 0.1
        },
        {
          "name": "mem",
          "value": 256,
          "inputMultiplier": 4.0
        },
        {
          "name": "disk",
          "value": 16
        }
      ]
    }
  }
}
We added a disk requirement of 16 MiB to resolve the warning. This space is only to accommodate any temporary storage needed as part of the job execution. The storage required to write the input files to disk is already accounted for by Seed. Now that our manifest is updated, explicitly perform a validation to ensure the warning is resolved:
seed validateINFO: Validating seed manifest file /Users/user/code/seed/guide/example/seed.manifest.json against schema...
INFO: Checking for variable name collisions...
SUCCESS: No errors found. /Users/user/code/seed/guide/example/seed.manifest.json is valid.With the warnings corrected, let’s create a new build:
seed buildIf an error getting credentials on Windows occurs, see the Error Getting Credentials section.
With a complete Seed image now created, we can now run our job using the Seed image. The last line of the console output shows us how we can use the Seed CLI to run our Seed job:
seed run -rm -in image-rotate-1.0.0-seed:1.0.0 -i INPUT_FILE=<file> -j DEGREES=<json> -o <outdir>5.5. Run
The seed run command provides the bulk of the functionality within the CLI.
This is how we ensure our job is ready to run in an operational environment.
By leveraging seed run we can be confident that the job we publish behaves consistently with how we defined our interface and requirements in the seed.manifest.json.
Let’s run our example to demonstrate the information the command can provide:
$ seed run
INFO: Image name not specified. Attempting to use manifest: .
INFO: Found manifest: /Users/users/code/seed/guide/example/seed.manifest.json
INFO: Retrieving seed manifest from image-rotate-1.0.0-seed:1.0.0 LABEL=com.ngageoint.seed.manifest
normalName: INPUT_FILE
ERROR: Error occurred processing inputs arguments.
ERROR: Incorrect input data files key/values provided. -i arguments should be in the form:
  seed run -i KEY1=path/to/file1 -i KEY2=path/to/file2 ...
The following input file keys are expected:
  INPUT_FILE

ERROR: Incorrect input data files key/values provided. -i arguments should be in the form:
  seed run -i KEY1=path/to/file1 -i KEY2=path/to/file2 ...
The following input file keys are expected:
  INPUT_FILE
The first three lines show how the seed run command inferred the image from our current directory because it contained a Seed manifest, which was then used to find the Seed image built from it.
The next two lines beginning with ERROR show how the CLI is also able to identify the inputs that are required, but we failed to provide (in this case, INPUT_FILE).
Let’s specify these inputs and try again:
$ seed run -i INPUT_FILE=seed.png -j DEGREES=180 -o output
INFO: Image name not specified. Attempting to use manifest: .
INFO: Found manifest: /Users/user/code/seed/guide/example/seed.manifest.json
INFO: Retrieving seed manifest from image-rotate-1.0.0-seed:1.0.0 LABEL=com.ngageoint.seed.manifest
normalName: INPUT_FILE
INFO: /Users/user/code/seed/guide/example/output-image-rotate-1.0.0-seed_1.0.0-2020-05-19T15_10_22-04_00 not found; creating directory...
INFO: Running Docker command:
docker run -v /Users/user/code/seed/guide/example/seed.png:/Users/user/code/seed/guide/example/seed.png -e INPUT_FILE=/Users/user/code/seed/guide/example/seed.png -v /Users/user/code/seed/guide/example/output-image-rotate-1.0.0-seed_1.0.0-2020-05-19T15_10_22-04_00:/Users/user/code/seed/guide/example/output-image-rotate-1.0.0-seed_1.0.0-2020-05-19T15_10_22-04_00 -e OUTPUT_DIR=/Users/user/code/seed/guide/example/output-image-rotate-1.0.0-seed_1.0.0-2020-05-19T15_10_22-04_00 -e DEGREES=180 -e ALLOCATED_CPUS=0.100000 -m 257m -e ALLOCATED_MEM=257 -e ALLOCATED_DISK=128.000000 image-rotate-1.0.0-seed:1.0.0 /Users/user/code/seed/guide/example/seed.png 180 /Users/user/code/seed/guide/example/output-image-rotate-1.0.0-seed_1.0.0-2020-05-19T15_10_22-04_00

-----------------------------------------------------------------
Rotating image with arguments /Users/user/code/seed/guide/example/seed.png 180 /Users/user/code/seed/guide/example/output-image-rotate-1.0.0-seed_1.0.0-2020-05-19T15_10_22-04_00
Done rotating image
-----------------------------------------------------------------

INFO: image-rotate-1.0.0-seed:1.0.0 run took 531.131393ms
INFO: Validating output files found under /Users/user/code/seed/guide/example/output-image-rotate-1.0.0-seed_1.0.0-2020-05-19T15_10_22-04_00...
SUCCESS: 1 files found for output ROTATED_IMAGE:
	/Users/user/code/seed/guide/example/output-image-rotate-1.0.0-seed_1.0.0-2020-05-19T15_10_22-04_00/ROTATED_180_seed.png
A complete run of our job! Let’s review what the CLI has accomplished for us:
-
A directory for output data was created prior to launch. If no output directory is provided, the CLI creates a timestamped directory to avoid any name collision during subsequent executions. This is mounted into the container from the host when the Docker container is launched.
-
OUTPUT_DIRenvironment variable is set on container launch to match the output volume that is being mounted at runtime to capture output. -
The input file
seed.pngwe specified is explicitly mounted into the container at runtime. Unlike when we ran our algorithm usingdocker run, we do not have to explicitly mount the input file as a volume—Seed handles that for us. -
INPUT_FILEenvironment variable is set on container launch to inject the absolute file path relative to the container context. This is why we indicate inputs via environment variable syntax in ourjob.interface.commandvalue of theseed.manifest.json. -
DEGREESenvironment variable is set on container launch to inject the value we specify for our JSON input type. -
Complete
docker runstatement is output to help identify the exact invocation command Seed CLI uses to launch THE Seed image. You can see the resource requirements identified as environment variables as well. Typically resource requirements are not needed, but JVM applications may benefit from explict understanding of their memory constraints. -
Following the output of our job, we can see the CLI validated that an output file was written in a location that matches the pattern we defined under
job.interface.outputs.files.
Now that we understand the basics of running and testing our job, we can use more advanced features of the
seed run command to further validate performance or exercise it against different test input datasets. See the
Use Cases section for more examples.
5.6. Publish
After testing our job, we will typically want to share it so that it can used by others. Seed supports several registry backends commonly used in the Docker ecosystem.
5.6.1. Using GitLab Container Registry
GitLab repositories, such as those available through GEOINT Services GitLab, have built-in Docker registries. Registry information can be found by going to Packages → Container Registry in the Project navigation pane.
In order to push to a GitLab Container registry using Seed CLI, it is necessary to first create a Personal Access Token. Be sure to check the box to give the token the "api" scope. The access token name will be used as the username and the token value as the password to log into the container registry.
The following command will publish our Seed image that we built and tested to a GitLab Container Registry:
INFO: Image name not specified. Attempting to use manifest: .
INFO: Found manifest: /Users/user/go/src/github.com/ngageoint/seed-cli/guide/example/seed.manifest.json
WARNING! Using --password via the CLI is insecure. Use --password-stdin.
Docker login warning: WARNING! Using --password via the CLI is insecure. Use --password-stdin.

Login Succeeded
INFO: Tagging image image-rotate-1.0.0-seed:1.0.0 as gitlab-registry.gs.mil/gitlab-group/gitlab-project/image-rotate-1.0.0-seed:1.0.0
INFO: Running Docker command:
docker tag image-rotate-1.0.0-seed:1.0.0 gitlab-registry.gs.mil/gitlab-group/gitlab-project/image-rotate-1.0.0-seed:1.0.0
INFO: Performing docker push gitlab-registry.gs.mil/gitlab-group/gitlab-project/image-rotate-1.0.0-seed:1.0.0
INFO: Running Docker command:
docker push gitlab-registry.gs.mil/gitlab-group/gitlab-project/image-rotate-1.0.0-seed:1.0.0
The push refers to repository [gitlab-registry.gs.mil/gitlab-group/gitlab-project/image-rotate-1.0.0-seed]
6c309c48ba6f: Layer already exists
6a5a6bdf35f9: Layer already exists
bdd20120cfff: Layer already exists
eba437426377: Layer already exists
4180ca71c974: Layer already exists
fffdb84c36f2: Layer already exists
50205a7df19a: Layer already exists
ef833453b9c7: Layer already exists
408e53c5e3b2: Layer already exists
50644c29ef5a: Layer already exists
1.0.0: digest: sha256:53c7ebd219a195d2670b7cceb93daacbdc8a21789ed2fb1a791a3d0ad0372e78 size: 2415
INFO: Removing local image gitlab-registry.gs.mil/gitlab-group/gitlab-project/image-rotate-1.0.0-seed:1.0.0
INFO: Running Docker command:
docker rmi gitlab-registry.gs.mil/gitlab-group/gitlab-project/image-rotate-1.0.0-seed:1.0.0
Untagged: gitlab-registry.gs.mil/gitlab-group/gitlab-project/image-rotate-1.0.0-seed:1.0.0
Untagged: gitlab-registry.gs.mil/gitlab-group/gitlab-project/image-rotate-1.0.0-seed@sha256:53c7ebd219a195d2670b7cceb93daacbdc8a21789ed2fb1a791a3d0ad0372e78|
It may take several minutes for the |
As can be seen from the output, we are internally performing a series of operations to publish the image.
We attach an appropriate tag to the Docker image to comply with the specification that reflects the remote registry gitlab-registry.gs.mil and organization gitlab-group/gitlab-project.
In a GitLab Container Registry, the "organization" is a combination of the Group and Project names.
This is followed by a push of the image to the repository and cleanup of the remote tags.
This leaves the local environment with only the image names built for publishing, which can be verified by running the docker images command.
5.6.2. Using Docker Hub
Docker Hub is a managed registry that makes it easy to publish your Seed image without configuring any additional services of your own. Before you can publish, you will need to register for an account at https://hub.docker.com.
|
Executing |
The following command will publish our Seed image that we built and tested to Docker Hub:
$ seed publish -r index.docker.io -O dockerhub-username -u dockerhub-username -p "dockerhub-password"
INFO: Image name not specified. Attempting to use manifest: .
INFO: Found manifest: /Users/user/code/seed/guide/example/seed.manifest.json
WARNING! Using --password via the CLI is insecure. Use --password-stdin.
Docker login warning: WARNING! Using --password via the CLI is insecure. Use --password-stdin.

Login Succeeded
INFO: Tagging image image-rotate-1.0.0-seed:1.0.0 as index.docker.io/dockerhub-username/image-rotate-1.0.0-seed:1.0.0
INFO: Running Docker command:
docker tag image-rotate-1.0.0-seed:1.0.0 index.docker.io/dockerhub-username/image-rotate-1.0.0-seed:1.0.0
INFO: Performing docker push index.docker.io/dockerhub-username/image-rotate-1.0.0-seed:1.0.0
INFO: Running Docker command:
docker push index.docker.io/dockerhub-username/image-rotate-1.0.0-seed:1.0.0
The push refers to repository [docker.io/dockerhub-username/image-rotate-1.0.0-seed]
156f2dc847e9: Pushed
a6d503001157: Mounted from library/busybox
1.0.0: digest: sha256:fc29e2201b87bc32a94c58afcebba45115bf930788c8d1b95f871a4de9356396 size: 734
INFO: Removing local image index.docker.io/dockerhub-username/image-rotate-1.0.0-seed:1.0.0
INFO: Running Docker command:
docker rmi index.docker.io/dockerhub-username/image-rotate-1.0.0-seed:1.0.0
Untagged: dockerhub-username/image-rotate-1.0.0-seed:1.0.0
Untagged: dockerhub-username/image-rotate-1.0.0-seed@sha256:fc29e2201b87bc32a94c58afcebba45115bf930788c8d1b95f871a4de9356396
As can be seen from the output, we are internally performing a series of operations to publish the image.
We attach an appropriate tag to the Docker image to comply with the specification that reflects the remote registry index.docker.io and organization dockerhub-username.
This is followed by a push of the image to the repository and cleanup of the remote tags.
This leaves the local environment with only the image names built for publishing, which can be verified by running the docker images command.
|
In the example above, we are pushing to our personal Docker hub account, where the organization is the same as the username.
For other use cases, the organization may differ from the username; for example, where organization is |
6. Reference
6.1. Use Cases
6.1.1. Reference Data
If a small amount of reference data (e.g. less than 100 MB) is needed for a Seed job, it can be included by adding the file to the Docker image. For larger amounts of reference data, avoid excessively increasing the size of the Docker image by passing the reference data to the job as a mountable directory. For more details about mounting directories, see the Docker documentation about bind mounts and using volumes.
6.1.2. Secret Data
Although it is generally preferable to use the Inputs object to pass in data, the Settings object can be used to specify sensitive information for the job, such as a database password.
|
Sensitive information, such as passwords, private keys, or other credentials should never been included as files or code in the Seed job. Always use the Settings object to inject these values. |
Update the job.interface object in our manifest from the [Tutorial] with a settings object:
{
  "seedVersion": "1.0.0",
  "job": {
    ...<omitted for brevity>...
    "interface": {
      ...<omitted for brevity>...
      "settings": [
        {
          "name": "MY_SECRET_SETTING",
          "secret": true
        }
      ]
    }
  }
}
Re-build the Seed job using the seed build command.
MY_SECRET_SETTING will be injected into the job as an environment variable at runtime.
It can be specified as a environment variable when executing the job using seed run:
seed run -i INPUT_FILE=seed.png -j DEGREES=180 -e MY_SECRET_SETTING=<secret-value>If the environment variable is ommitted from the seed run command, the Seed CLI will output an error:
$ seed run -i INPUT_FILE=seed.PNG  -j DEGREES=180
INFO: Image name not specified. Attempting to use manifest: .
INFO: Found manifest: /Users/user/code/seed/guide/example/seed.manifest.json
INFO: Retrieving seed manifest from image-rotate-1.0.0-seed:1.0.0 LABEL=com.ngageoint.seed.manifest
normalName: INPUT_FILE
INFO: /Users/user/code/seed/guide/example/output-image-rotate-1.0.0-seed_1.0.0-2020-04-21T14_37_21-04_00 not found; creating directory...
ERROR: Error occurred processing settings arguments.
ERROR: Incorrect setting key/values provided. -e arguments should be in the form:
  seed run -e SETTING=somevalue ...
The following settings are expected:
  MY_SECRET_SETTING

ERROR: Incorrect setting key/values provided. -e arguments should be in the form:
  seed run -e SETTING=somevalue ...
The following settings are expected:
  MY_SECRET_SETTING
When running the Seed job on a Scale cluster, secret names and values are input as part of the JobType definition in Scale. Scale then stores the secrets in a {hashicorp-vault-url[HashiCorp Vault] secret store where they are only accessible by running jobs. The system will automatically retrieve any secrets defined in the Seed job and inject them at runtime. You can also contact the Scale team for assistance with adding JobTypes that contain secrets.
6.1.3. Jupyter Integration
Using a Jupyter Notebook algorithm to make a Seed job is possible, but it requires more steps than a standard script. This guide will assume a basic understanding of Jupyter Notebooks.
6.1.3.1. Requirements
All the necessary software for creating a standard Seed image, seen in Algorithm Requirements, is also required for a Jupyter Notebook image. In addition, notebooks also require the Jupyter Notebook software. Once Python and pip is installed, Jupyter Notebooks can be installed by the following commands.
pip3 install --upgrade pip
pip3 install jupyter
For more information, look at the Jupyter Installation Guide.
6.1.3.2. Sample Notebook
The sample Notebook will rotate an image a specified number of degrees just as in the sample algorithm in the Seed tutorial. Once the notebook is integrated into Docker the image process will be identical to the sample algorithm.
6.1.3.2.1. Making the Notebook
Open the terminal or command line in your project folder and run the following
jupyter notebookAfter setting up the server, the application should open the default the browser to the Jupyter Notebook web application. Once there, select the New button at the top right and from the drop down click Python3. This will open a new tab with the notebook editor. Using the editor, create an image_rotate.ipynb file:
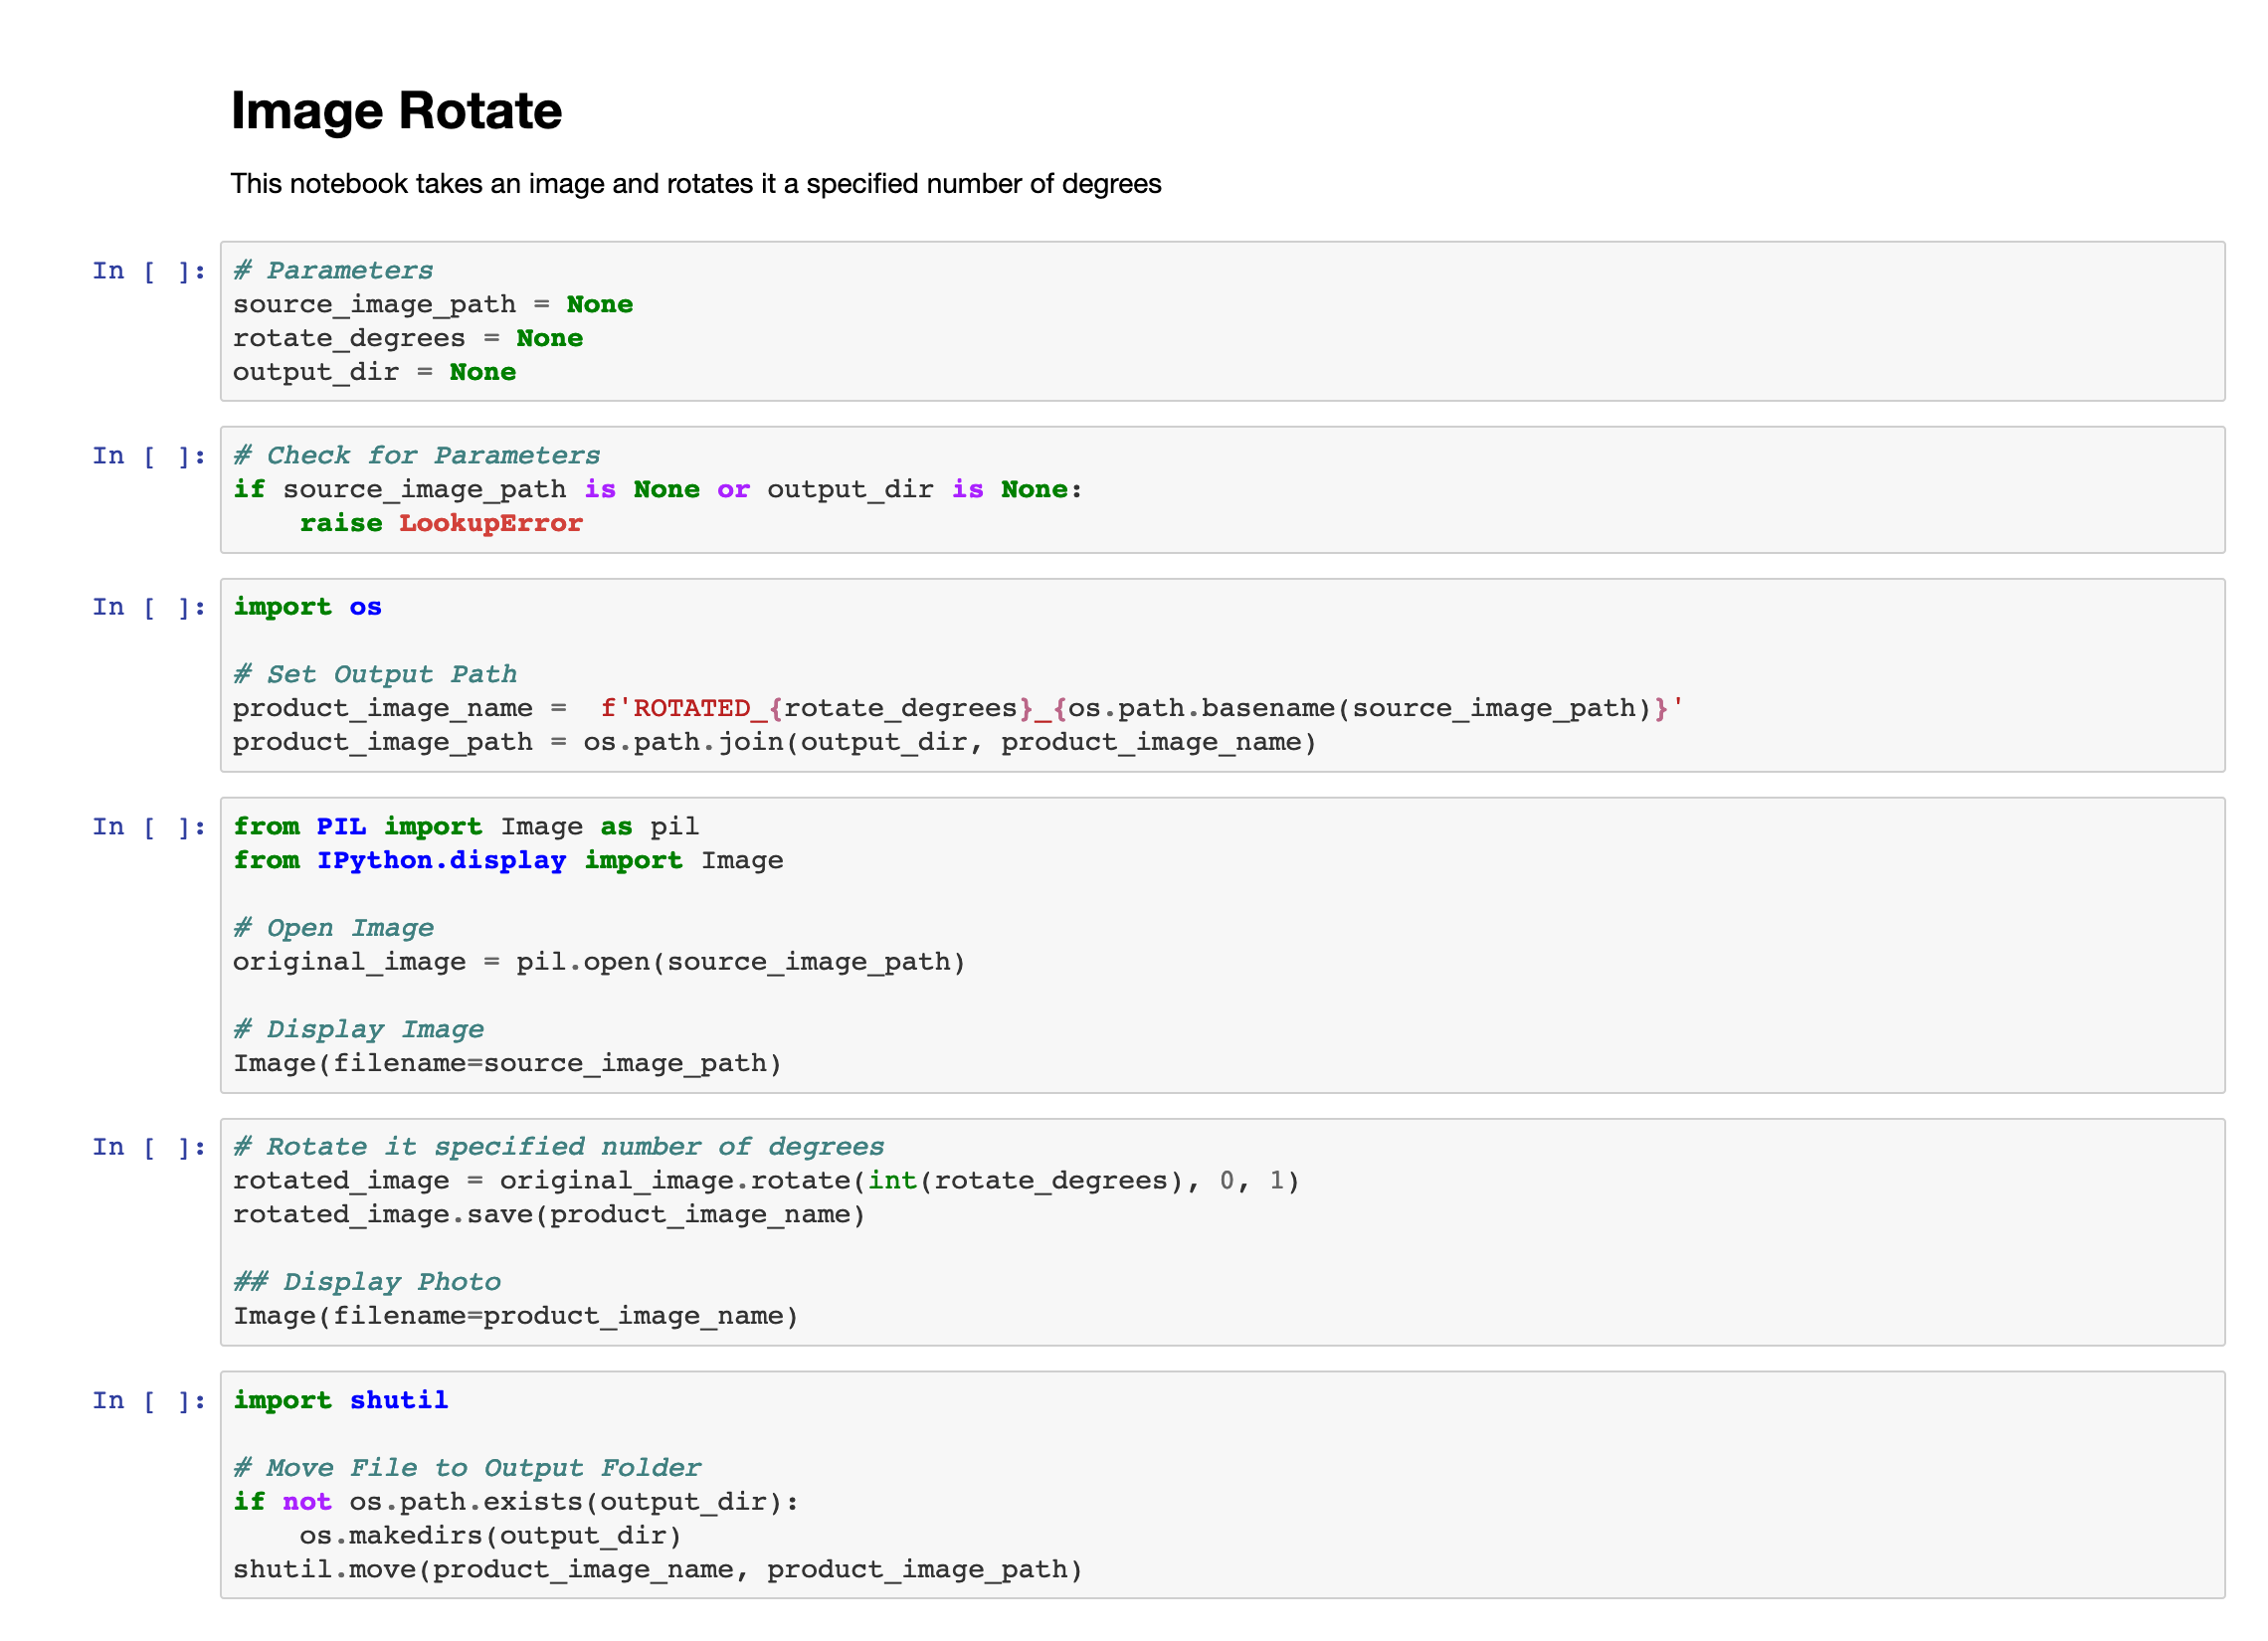
Currently the notebook will not run properly as the variables in the first code cell are set to None. To test the notebooks functionality, these variables can be set to real values like below.

The notebook can then be run by selecting Cell from the toolbar and then selecting Run All from the dropdown. Make sure to set the values of the variables back to None after testing.
6.1.3.2.2. Adding Arguments to the Notebook
Jupyter Notebooks by default do not support arguments. This is due to the interactive nature of the notebooks. To add parameterization to a notebook a third party tool is required. This guide will be using Papermill. Papermill can also be used to execute notebooks as well, but this feature will not be utilized in this example.
To add parameters to a notebook, it is necessary to add cells that contain variables whose names are the intended parameter names. In the case of the sample, the parameters are input_file_path and output_directory as seen in the second cell.
|
It is not necessary to set the variable values to None, however it does allow for easy error checking as seen in the third cell. |
To allow Papermill to be able to see these variables, the cell requires a special tag. To add tags they first must be editable: select Edit from the toolbar, from the dropdown select Cell Toolbar, and from that dropdown select Tags. If done correctly the cells will have an add tag bar as displayed below.

From there in the text input next to the Add tag button type in "parameters" and click Add tag.
6.1.3.2.3. Adding Error Handling the Notebook
In case of unintended behavior, it is often necessary to exit an algorithm early. This is a problem in Jupyter Notebooks as commands used for graceful exits, such as sys.exit(<return-code>), raise an exception instead of exiting. This does stop cell execution, but does not stop Jupyter’s kernel. Furthermore, all exceptions raised in a Jupyter Notebook are converted to the generic CellExecutionError. This ungraceful exit problem will be alleviated by the use of a script which will catch the exceptions. If an early exit is required raise an appropriate exception.
6.1.3.2.4. Implementing Return Codes
Another side effect of sys.exit(<return-code>) unwanted behavior is the inability to set a return code. To counter act this, the cell metadata will be changed to add a return code which can be read by another script. Editing cell metadata is similar to tags. Select Edit from the toolbar, from the dropdown select Cell Toolbar, and from that dropdown select Edit Metadata. If done correctly the cells will have an Edit Metadata button as displayed below.

Click the Edit Metadata button for the intended cell and it will bring up a pop-up to edit the metadata. The format of the metadata is json. Some cells may have some metadata already, such as the second cell which will have the parameterize tag within the cell data. To add a return code to the cell use the following json.
"code": <return-code>|
The Name does not need to be named |
Currently the changes made by editing the metadata and adding the parameter tag have no effect on notebook execution. In order to give these metadata changes functionality, a python script to run the notebook is required.
6.1.3.3. Python Script
A python script is used to execute the notebook, handle exceptions, add parameters and read the metadata. It leverages nbformat, nbcnvert, and Papermill tools.
6.1.3.3.1. Sample Script
The script below will be what will be used with the sample Jupyter Notebook already provided. This script should work for most standard python3 notebooks provided that the parameters dictionary is given the correct pairs.
import os
import sys
import re
import json
import nbformat
from nbconvert.preprocessors import (
  ExecutePreprocessor,
  CellExecutionError
)
from papermill import (
    execute as mill,
    PapermillException
)
from jupyter_client.kernelspec import NoSuchKernel

def readNotebook(nb_file_path):
  """
  Opens a Jupyter Notbook to read
   - Parameters: nb_file_path
   - Returns: notebook, boolean
  """
  f = None
  nb = None
  success = False
  try:
    f = open(nb_file_path, "r")
    nb = nbformat.read(f, as_version=4)
    success = True
  except (UnicodeDecodeError, FileNotFoundError) as err:
    print(err, file=sys.stderr)
  finally:
    if f != None:
      f.close()
  return nb, success

def writeNotebook(nb_file_path, nb):
  """
  Opens a Jupyter Notbook to write
   - Parameters: nb_file_path, nb
   - Returns: boolean
  """
  f = None
  success = False
  try:
    f = open(nb_file_path, "w")
    nbformat.write(nb, f)
    success = True
  except UnicodeDecodeError as err:
    print(err, file=sys.stderr)
  finally:
    if f != None:
      f.close()
    return success

def parameterize(nb_input_file_path, nb_output_file_name, parameters, nb):
  """
  Adds parameters to the Jupyter Notebook
   - Parameters: nb_input_file_path, nb_output_file_name, parameters, nb
   - Returns: notebook, boolean
  """
  success = False
  try:
    nb = mill.execute_notebook(
      nb_input_file_path,
      nb_output_file_name,
      parameters=parameters,
      prepare_only=True,
      log_output=True
    )
    success = True
  except FileNotFoundError as err:
    print(err, file=sys.stderr)
  finally:
    return nb, success

def startPreprocessor(kernel):
  """
  Opens a Jupyter Notbook to write
   - Parameters: kernel
   - Returns: preprocessor, boolean
  """
  ex = None
  success = False
  try:
    ex = ExecutePreprocessor(kernel_name=kernel)
    ex.km, ex.kc = ex.start_new_kernel()
    success = True
  except NoSuchKernel as err:
    print(err, file=sys.stderr)
    ex = None
  finally:
    return ex, success

if __name__ == "__main__":
  # Return Codes
  ERROR_ARGUMENT     = 1
  ERROR_INPUT        = 2
  ERROR_PAPERMILL    = 3
  ERROR_PREPROCESSOR = 4
  ERROR_GENERIC_CELL = 5
  ERROR_OUTPUT       = 6

  # Arguments
  if len(sys.argv) != 5:
    print("ERROR> Incorrect Usage")
    print("Incorrect number of arguments", file=sys.stderr)
    sys.exit(ERROR_ARGUMENT)
  nb_input_file_path = sys.argv[1]
  input_file_path = sys.argv[2]
  rotate_degrees = sys.argv[3]
  output_directory = sys.argv[4]

  kernel = "python3"
  nb_output_file_path = os.path.join(output_directory, f'EXECUTED_{os.path.basename(nb_input_file_path)}')

  # Open Notebook
  nb, is_read = readNotebook(nb_input_file_path)
  if is_read == False:
    print("ERROR> Input File not Found or isn't Valid!")
    sys.exit(ERROR_INPUT)
  print("LOG> Read in Notebook!")

  # Parameters
  parameters = dict(source_image_path=input_file_path, rotate_degrees=rotate_degrees, output_dir=output_directory)
  nb, parameters_set = parameterize(nb_input_file_path, nb_output_file_path, parameters, nb)
  if parameters_set == False:
    print("ERROR> Papermill Failed to Set to Parameters!")
    sys.exit(ERROR_PAPERMILL)
  print("LOG> Parameters Set!")

  # Setup Preprocessor
  ex, is_start = startPreprocessor(kernel)
  if is_start == False:
    print("ERROR> ExecutePreprocessor Failed to Start!")
    sys.exit(ERROR_PREPROCESSOR)
  print("LOG> Kernel Started!")

  # Execute Notebook
  return_code = 0
  cell_count = 0
  try:
    for cell in nb.cells:
      ex.preprocess_cell(cell, None, cell_count)
      cell_count += 1
    print("LOG> Execution Complete!")
  except CellExecutionError as e:
    # Clean Exception Info
    ipyReturn = str(e)
    ansi_escape = re.compile(r'(\x9B|\x1B\[)[0-?]*[ -\/]*[@-~]')
    cleanedReturn = ansi_escape.sub('', ipyReturn)

    # Find Error Code
    metadata = cell.metadata
    if "code" in metadata:
      return_code = metadata["code"]
    else:
      return_code = ERROR_GENERIC_CELL

    # Output
    print(cleanedReturn, file=sys.stderr)
    print("ERROR> Execution Failed at Cell " + str(cell_count) + "!")
  finally:
    # Write Output to Notebook
    if writeNotebook(nb_output_file_path, nb) == False:
      print("ERROR> Output File is Invalid or isn't Writeable!")
      sys.exit(ERROR_OUTPUT)
    print("LOG> Writing Complete!")

    # Shutdown Kernel and Exit
    ex.km.shutdown_kernel()
    print("LOG> Quitting...")
    sys.exit(return_code)
If it is necessary to create a custom script for your Jupyter Notebook, the following will go more in depth on the general process of how to make a script.
6.1.3.3.2. Reading in the Notebook
Reading in a notebook requires first opening up a notebook and then reading the json data that makes up the notebook to a variable, which in this case will be named nb. Opening the notebook is standard, reading it uses the nbformat tool. This will also be used later to write to an output notebook. Code to open a notebook is shown below.
f = open(nbFileName, "r")
nb = nbformat.read(f, as_version=4)
f.close()
6.1.3.3.3. Papermill
As previously discussed, to add parameters to a Jupyter Notebook a "parameter" tag needs to be attached to a cell so that Papermill recognizes it. An example of how Papermill can be used is below.
nb = mill.execute_notebook(
      nb_input_file_path,
      nb_output_file_path,
      parameters=dict(<parameter>=<value>, ...),
      prepare_only=True,
      log_output=True
    )
nb_input_file_path and nb_output_file_path are the direct paths to the intended location and names of the input and output Jupyter Notebooks. The parameters parameter must be a dict containing pairs of parameters set in the Jupyter Notebook and their intended value. prepare_only=true only exports the parameter values to the Jupyter Notebook and does not execute the notebook. Execution of the notebook is done later in the script using Jupyter’s nbconvert tool.
6.1.3.3.4. Preprocessor
While its not entirely necessary to manually create a preprocessor to run the notebook, but doing so gives you a lot more customization including:
-
Cell-by-cell execution
-
Specifying the Kernel used
-
Custom Preprocessor
Creating a custom preprocessor will require development, but will give the most control over execution. Cell-by-cell execution and specifying the kernel are easy to implement by comparison and are used in the sample script. To create a preprocessor to execute the notebook, look at the code displayed below.
ex = ExecutePreprocessor(kernel_name=<kernel>)
ex.km, ex.kc = ex.start_new_kernel()
For the value of kernel_name set it to python3. The python kernel is already required for any notebook, regardless of kernel, so nothing else extra is required.
|
Other non-python kernels may be supported in the future. For those, you would need to install them in your docker file like IPython. |
6.1.3.3.5. Execution
Execution is done on a cell-by-cell basis. This is done primarily to get better error checking out of the notebook. If the notebook is executed all at once, the only exception that can be caught is the CellExecutionError with a return code of 1. By running the cells sequentially, it is possible to get return codes based on individual cells as opposed to the notebook as a whole. Doing this is as simple as a try-catch and a for loop.
return_code = 0
cell_count = 0
try:
for cell in nb.cells:
    ex.preprocess_cell(cell, None, cell_count)
    cell_count += 1
except CellExecutionError as error:
    error_string = str(error)
    ansi_escape = re.compile(r'(\x9B|\x1B\[)[0-?]*[ -\/]*[@-~]')
    cleaned_error_string = ansi_escape.sub('', error_string)
    print(cleaned_error_string, file=sys.stderr)

    #<generate-return-code>
finally:
    ex.km.shutdown_kernel()
Generation of the return code can be done a variety of ways. This is up to the discretion of the developer. One way is to look at the cell’s metadata and base it off the json data stored within it. An example of this can be seen below.
metadata = cell.metadata
if "code" in metadata:
    return_code = metadata["code"]
else:
    return_code = ERROR_GENERIC_CELL
6.1.3.3.6. Write to Notebook
Writing to a notebook is very similar in implementation to reading a notebook. As before, a output notebook must first be opened (and created) and then the nbformat tool is used to write the executed cells to the output notebook.
f = open(nbFileName, "w")
nbformat.write(nb, f)
f.close()
6.1.3.4. Running in Docker
First, create a script called image_rotate.sh in the same directory as the Python file created above:
#!/bin/sh

NOTEBOOK="image_rotate.ipynb"
INPUT=$1
DEGREES=$2
OUTPUT_DIR=$3

echo ''
echo '-----------------------------------------------------------------'
echo 'Rotating image with arguments '${INPUT} ${DEGREES} ${OUTPUT_DIR}

python3 ./run_notebook.py $NOTEBOOK $INPUT $DEGREES $OUTPUT_DIR
rc=$?

echo 'Done rotating image'
echo '-----------------------------------------------------------------'
echo ''
exit ${rc}
We will use the script to invoke our Jupyter algorithm
Create a file named Dockerfile in the same directory:
FROM alpine:3.12

RUN apk update && \
    apk add --no-cache build-base libzmq musl-dev zeromq-dev python3 python3-dev py-pip jpeg-dev zlib-dev

RUN pip install --upgrade pip && \
    pip install nbconvert && \
    pip install papermill && \
    pip install jupyter_client && \
    pip install Pillow >= 7 && \
    python3 -m pip install ipykernel && \
    python3 -m ipykernel install --user

WORKDIR /usr/algo

COPY ./run_notebook.py .
COPY ./image_rotate.sh .
COPY ./image_rotate.ipynb .
RUN chmod +x ./image_rotate.sh
With these files, we can create our initial Docker containerized sample algorithm. Issue the following terminal commands to build the Docker image:
sudo docker build -t nb-img-test .The image may take a minute or two to build. The -t flag is used to specify the name and optional tag for the Docker image in the 'name:tag' format. In this case, we have used the name img-test, but we could use any name. Once it completes successfully, you should see output similar to the following:
Successfully built 84dd346586d1
Successfully tagged nb-img-test:latest
Now run the Docker container using the following command:
jupyter % docker container run --rm -it -v ${PWD}:/usr/algo nb-img-test:latest ./image_rotate.sh seed.png 45 outputOutput should be similar to the following:
-----------------------------------------------------------------
Rotating image with arguments seed.png 180 output
LOG> Read in Notebook!
LOG> Parameters Set!
LOG> Kernel Started!
LOG> Execution Complete!
LOG> Writing Complete!
LOG> Quitting...
Done rotating image
-----------------------------------------------------------------
6.1.3.5. Initialization
the rest of the process is identical to the included example, go to the Initialization section and follow the rest of the tutorial.
6.2. Optimization
6.2.1. Image Optimization
Use of Anaconda and other large libraries associated with data science and machine learning jobs is common. This makes sense for development on Windows or other environments that make compilation of complex scientific and math libraries challenging but should not be used in a Seed job. As a rule of thumb, in order to avoid excessive strain on Docker registry and image cache resources, Docker images in Seed jobs should be kept under 500 MB. Docker images should be based on minimal operating systems, such as Alpine or Busybox, and layer optimization techniques should be applied. Docker recommends a number of best practices for writing Dockerfiles.
6.2.2. Image Clean-up
Another strategy for optimizing the size of the Docker image associated with the Seed job is to add commands to clean up after any package installations.
Consult the documentation for any package management system used by the operating system (e.g apk or yum) and/or language (e.g. pip or mpm), as the exact clean-up commands will vary depending on the environment and tools being used.
6.3. Best Practices
6.3.1. Workflow Decomposition
Breaking down larger processing chains into separate jobs will yield benefits throughout the algorithm development lifecycle. Problems can be discovered sooner and component algorithms can be built and tested independently, helping to minimize any single person or team being a bottleneck. The greatest benefits can be realized when extracting general purpose, reusable jobs that can be applied to multiple data types, such as a job for generating a tile pyramid within a GeoTIFF. This also helps ensure that commonly used jobs are both optimized and thoroughly proven by reuse. Of course, there are always exceptions, and some algorithms (e.g. those that are I/O bound) may benefit from combining several processing steps into a single job.
6.3.2. Log Everything
Not having direct access to the file system of your job means the only method for feedback on what is happening inside the container is through console output. Use standard output and/or standard error to indicate any progress or errors for your algorithm. Some languages (such as Python) may require specifying that output should not be buffered until the process exits. This will facilitate live viewing of output for long-running processes.
6.3.3. Meaningful Errors
Specific error conditions represented by unique process exit codes should be used to give clear feedback when a known error has occurred. These can be used to distinguish between data errors (where the data arrived but contained an error that could not be automatically addressed by the job) and errors that occurred within the job execution itself. See also Why should I define error codes? in the FAQ section.
6.3.4. Runtime Configuration
Most jobs have configuration values that are desirable to change at runtime. These could be anything from confidence values for feature detection, to a band number within a multi-band image. Ensure that your job can consume its configuration as either environment variables or command-line arguments. This makes it possible to define your job as a configurable Docker image and avoid requiring the creation of new Docker images for common changes.
6.3.5. Privilege Minimization
Docker images often are set to use the root user by default.
Avoid this unless absolutely necessary.
Instead of using the root user, add a non-privileged user to the Docker image and set the USER for the image to this non-privileged user.
6.3.6. Dockerfiles
Docker provides guidance on some additional best practices for writing Dockerfiles.
6.4. Running Natively on Windows
|
We strongly recommend using Seed with WSL 2 in order to avoid incompatibilities between environments. Algorithms must use a base Linux operating system to run in Scale. |
6.4.1. Add Seed CLI to PATH on Windows
On Windows, search for Edit environment variables for your account.
This will open a dialog showing the user environment variables for your account.
Select "Path", then click the "Edit" button, which will open another dialog.
Click "New", and enter the path to the folder containing the seed.exe binary file on your system.
Ensure the path does not end in a slash and specify only the containing folder, not the full path to seed.exe.
For example, if the full path to seed.exe is C:\Program Files\Seed-CLI\seed.exe, the Path value should be the following:
C:\Program Files\Seed-CLI6.4.2. Line Endings
When using Docker for Windows with a Linux Docker container, the files added to the Docker image must have Unix-style line endings. These can be changed using a text editor such as NotePad++ or a command-line utility such as dos2unix.
6.4.3. File Paths
On Windows, we recommend to manually specify host paths using forward slashes rather than backsplashes, which are typically used for Windows paths. For example, use "//C/Users/Username/path/to/seed-test" instead of "C:\Users\Username\path\to\seed-test".
6.5. Frequently Asked Questions (FAQs)
6.5.1. What is this Seed image?
Seed is a general standard that was developed to aid in the discovery and running of self-contained algorithms. It is a JSON-defined manifest that is embedded into the Docker image as a label. It defines:
-
Algorithm - name, version, description
-
Developer - name, company, contact info
-
Inputs/Outputs - how many, what type
-
Hardware Requirements - CPUs, memory, disk
-
Error handling - data vs. algorithm errors
-
Environment variables
-
Mounts
6.5.2. How do I use Docker?
Many resources for learning about Docker can be found on the Docker website. The primary goal of this guide is to explain how to integrate an algorithm with Seed and not focus on how to build a Docker container.
6.5.3. Why not just add all the files in my directory to the Docker image?
The image should be as small as possibly and only include the necessary files. It is pulled across the network each time it runs on a node, so smaller images result in less network traffic.
6.5.4. Why not just increase the hardware resources as much as possible? I want it to run fast.
It is critical to strike a balance between the minimum resources required to run the algorithm and acceptable runtimes.
Scale depends on accurate requirements in order to efficiently schedule jobs on the cluster.
If a job requests more resources than it uses, these resources are wasted as they cannot not be allocated to other jobs.
In a cloud environment, wasted resources equate to wasted money.
When job requirements depend on the input, the Seed manifest supports specifying a multiplicative value for the resource requests via the inputMultiplier property.
6.5.5. My algorithm requires some reference data, should I just embed it into the Docker image?
It depends. If the total size of the file(s) is sufficiently small (e.g. less than 100 MB), add it into the Docker image. If it has larger requirements, such as a lookup directory, please work with the Scale team to create a mountable directory.
6.5.6. How to secure sensitive information like passwords inside my Docker image?
The Seed manifest allows the developer to define "Settings", which will be defined as environment variables at runtime. These "Settings" can be marked as "secret" and will be stored in HashiCorp Vault when running the job in a processing system that consumes Seed images, such as Scale. The values for these environment variables are hidden and only injected at runtime. See Secret Data for more details.
6.5.7. Why should I define error codes?
The developer should properly capture and define errors in their code using exit codes. The Seed manifest allows the developer to define specific error codes with name, description, and type (job vs. data). A data error indicates that the input data was invalid and the job will never be able to run it. All other errors are job errors and could potentially be resolved on future executions (re-queues/re-process). A third type, "System" errors, are reserved for the Scale framework.
6.5.8. How do I use exit codes in Python/Matlab/Java/etc.?
Code should use proper try/catch or if/else statements to identify the type of error. The code can exit with any value between 0-255. The zero value indicates successful run. The exit code can be checked after a program finishes with "echo $?".
Common examples exiting with code 42:
Python: sys.exit(42)
Matlab: exit(42)
Java: System.exit(42)
C/C++: exit(42)
Shell: exit 42
6.5.9. My algorithm involves running Python code, followed by Matlab code, and finally C code. Should I put it all in one Docker image?
It depends. Does each step involve heavy processing or create time-consuming intermediate products? If so, they would be better as their own standalone jobs with its output products being passed to a subsequent step in a workflow. If the individual steps are relatively small (in runtime and resources), it can all run within a single container using a shell script or similar to execute each step.
6.6. Troubleshooting
6.6.1. Python ModuleNotFound Errors
If the following ModuleNotFound error occurs, it likely means the Pillow library is not installed correctly.
Please refer to the Pillow installation instructions.
Traceback (most recent call last):
  File "image_rotate.py", line 5, in <module>
    from PIL import Image
ModuleNotFoundError: No module named 'PIL'
If the following SyntaxError occurs, it likely means you are using Python 2 instead of Python 3.
Please refer to these instructions for installing Python.
File "image_rotate.py", line 9
  product_image_name =
    f'ROTATED_{rotate_degrees}_{os.path.basename(source_image_path)}'
                                                                    ^
SyntaxError: invalid syntax
6.6.2. Error Getting Credentials
When using WSL 2 on Windows, some users have reported the following error:
ERROR: rpc error: code = Unknown desc = error getting credentials - err: exec: "docker-credential-desktop.exe": executable file not found in $PATH, out: ``If this occurs, add a symlink to docker-credential-desktop.exe; e.g.
sudo ln -s /mnt/c/Program\ Files/Docker/Docker/resources/bin/docker-credential-desktop.exe /usr/bin/docker-credential-desktop.exe